April 17, 2026
Wall Panels in the Bathroom: 7 Pre-Buy Tips
Designing a bathroom without tiles sounds like a modern trend — and is actually a pragmatic, proven solution. Wall panels in the bathroom save time, money, and nerves. But there are seven things you really should know before buying.
1. Not every panel is bathroom-suitable
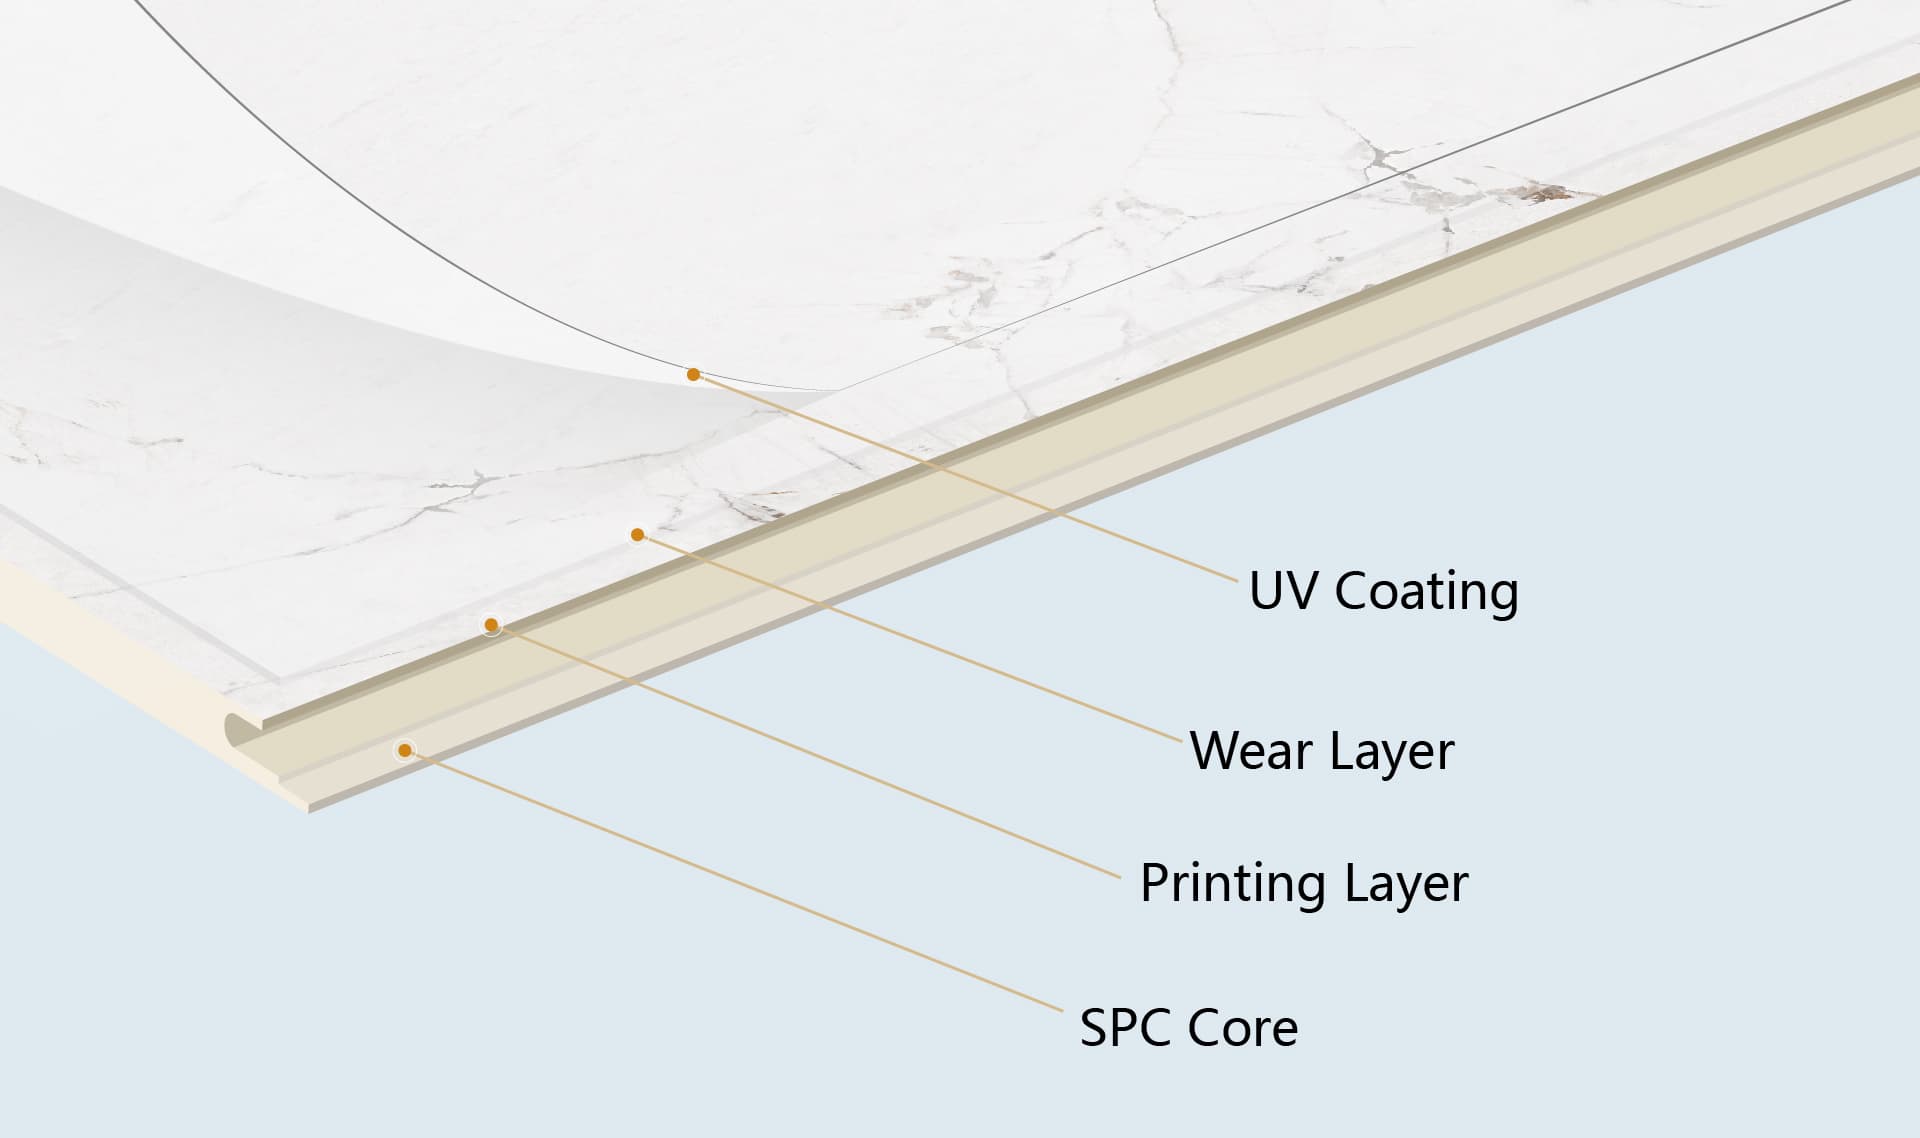
The most important point upfront: "wall panel" is a catch-all term for very different products. MDF panels look good in the showroom but swell irreparably under prolonged moisture. Cheap PVC panels often have poorly-sealed click connections.
For wet areas, SPC is the only material we can recommend. It absorbs no moisture, click connections are sealed by design, and the PU sealant makes the surface completely water-repellent.
2. Backside ventilation is critical
This is where most amateur installations go wrong. Panels are mounted to the wall, silicone is applied at every joint — and suddenly there's no air exchange behind. Minimal residual moisture can't dry out. After 12–24 months: mould.
The solution is simple: leave 3–5 mm of air between panel and floor/ceiling. This gap is later covered by baseboard and ceiling trim — visually invisible, but breathable.
3. Waterproof vs. steam shower
"100% waterproof" sounds like an absolute, but there are nuances. Normal showers and bathtubs are unproblematic for our SPC panels. For very intensive uses (steam showers, rain showers with large rainheads, saunas) we additionally recommend a PE film vapour barrier behind the panels.
4. Installing over old tiles? Yes, but…
One of the biggest advantages of wall panels: they can be installed directly over existing tiles. Conditions:
- Tiles must be firmly seated. Hollow-sounding tiles detach and take the panel with them.
- Surface must be clean. Limescale, grease, old silicone residue removed.
- Account for 8–12 mm total buildup. Doors and fitted furniture can suddenly jam.
5. Silicone is not silicone
Use exclusively sanitary silicone with fungicide additive, not window silicone or hardware-store universal silicone. Window silicone in bathroom climate can develop mouldy black spots within months.
6. What does a panel bathroom really cost?
Honest cost breakdown for a typical 6 m² bathroom:
Tile alternative: material €400–800, labour €900–1,400 professional, duration 5–10 working days. Total: €1,300–2,200.
Panel alternative: material €400–700, DIY 5–8 hours or labour €180–300 professional, duration 1–2 working days. Total: €400–1,000 DIY to €580–1,300 professional.
Savings: 40–70%. Construction site: 1–2 days instead of 1–2 weeks.
Hidden costs many forget
Three items often missing from typical DIY estimates but adding up to €200:
- Profiles: ceiling trim, skirting, corner profiles. For 6 m² expect €50–90.
- Installation supplies: hybrid-polymer adhesive (2–3 cartridges), sanitary silicone (2 cartridges), masking tape.
- Tool acquisition if needed: sharp utility knife, rubber mallet, silicone spatula set.
Practical examples: which panel where in the bathroom?
Not every area in the bathroom is equal. Practical recommendation by zone:
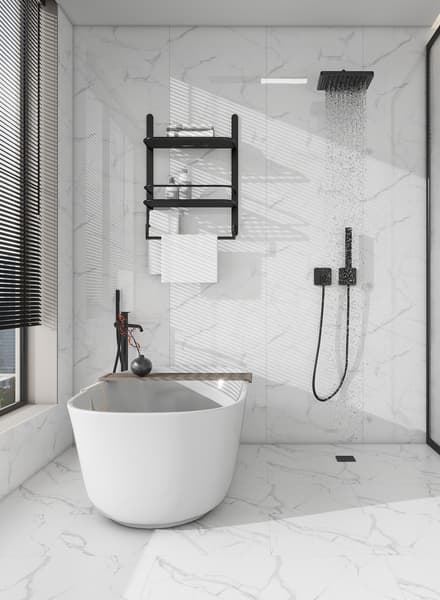
Shower zone
Most demanding zone. Continuous contact with water, steam, soap. Recommendation: SPC with smooth surface (high-gloss or satin), full-surface bonding, sanitary silicone at all joints to shower tray and mixer. For rain showers additionally PE vapour barrier behind the panel. Our Carrara Bianco Glossy has proven itself here especially.
Bathtub surround
Less critical than the shower. Standard SPC with sanitary silicone at the tub upper edge suffices. Matte surfaces show limescale less than high-gloss.
Sink and mirror area
The most relaxed zone. Any SPC panel suitable, including wood-look (which you'd avoid in direct splash). Tip: plan mirror lighting so panels aren't directly illuminated — otherwise minor surface unevenness shows.
Ceiling and dry wall areas
No special requirements. Full-surface bonding is mandatory on ceilings anyway (click system doesn't hold). You can use less expensive matte panels here.
7. Long-term maintenance
- Weekly: microfibre cloth + warm water.
- Monthly: mild pH-neutral cleaner against limescale.
- Yearly: check silicone joints. Reapply discoloured or loose sections.
- Never: aggressive abrasive cleaner, steel wool, acetone, pure alcohol.
With correct care SPC panels last 20+ years. That's longer than most modern tile groutings.
Frequently asked questions
How watertight are click connections really?
Very watertight — but not infinite. Every click connection in SPC panels has a factory-sealed profile that produces a moisture-tight joint under proper pressing. Sufficient for splash water. With standing water (e.g. shower unfiltered water rising 10 cm) minor moisture can penetrate — hence the tight sanitary silicone at the floor transition.
Will mould grow behind the panels?
Not with correct installation. Three conditions must be met: (1) dry, well-prepared wall before installation; (2) 3–5 mm ventilation gap top and bottom; (3) functioning bathroom ventilation (window or extractor). With all three respected, mould is not a concern.
Can I remove panels again after 10 years?
With click installation yes — non-destructively. With full bonding no — panels break on removal, and adhesive residue remains. Rarely a problem in practice: SPC's 20+ year lifespan usually outlasts how long you'll keep the room unchanged.
Can the panels be heated? IR heating behind?
Yes — NordPaneele tolerate surface temperatures up to 28 °C continuously. IR area heating behind SPC panels is feasible with properly sized heating output and clearance.
What happens with water damage?
SPC itself takes no damage — even with days of underwater exposure. The issue is the wall behind: if moisture penetrates silicone or click joints, the masonry can't dry out. If damaged: remove panels, let wall dry (moisture measurement before reinstall), then re-bond.
The 5-point pre-order checklist
Before ordering your bathroom panels, go through this list. Ten minutes now saves weeks of frustration later:
- Measure room dimensions. Not just height × width, but all cutouts (heater, mirror cabinet, towel radiator). An incorrect measurement delivers too little material and extends the project by 1–2 weeks.
- Check ventilation. Windowless bathrooms need a functioning extractor fan. Questionable air circulation? Consult a specialist before installing panels.
- Measure residual moisture. With a simple moisture meter (€30 at any hardware store) at three wall positions. Values under 2% are generally unproblematic; higher: let dry out.
- Inspect plumbing connections. Any later repair behind a panel becomes drama. Better check upfront and replace if needed.
- Lighting planning. Direct light on high-gloss panels reveals every minor unevenness. Plan indirect lighting before installation — retrofit isn't always possible.
What to tell your installer
If you're hiring a tradesperson rather than DIY, these are the four non-obvious briefing points that separate good from mediocre jobs:
- Insist on full-surface bonding (not click-system) for wet areas. Some installers default to click because it's faster — but the moisture-resistance is lower.
- Specify sanitary silicone with fungicide additive, explicitly. "Silicone" isn't enough — the installer might reach for the cheapest tube.
- Ask for photos of the prep work before panels go on. Document the substrate condition and moisture measurements. If something goes wrong later you have a record.
- Confirm they leave the 3–5 mm ventilation gap top and bottom. Some installers skip this to save time with baseboard installation.
Conclusion
In 85% of bathroom renovations, SPC wall panels are today the economically and aesthetically better choice than tiles. Questions? Get in touch, or order free samples to judge quality yourself. Our bathroom collection shows the most popular decors.
One last practical tip: before you start installing, photograph the current state of your wall (including cutouts, pipes, connections). Those photos are gold when in 5 years a plumber is hunting for a hidden pipe or you need to document an insurance claim. 30 seconds of effort now saves hours later.
Related articles: Installation guide · SPC vs PVC vs real wood · Fire classes B1